Manage and visualize your Jira issues
This guide demonstrates how to bring your Jira issue management experience into Port. You will learn how to:
- Ingest Jira project and issue data into Port's software catalog using Port's Jira integration.
- Set up self-service actions to manage issues (create, change status, and add comments).
- Build dashboards in Port to monitor and act on issues.
Common use cases
- Monitor the status and health of all Jira issues from a centralized dashboard.
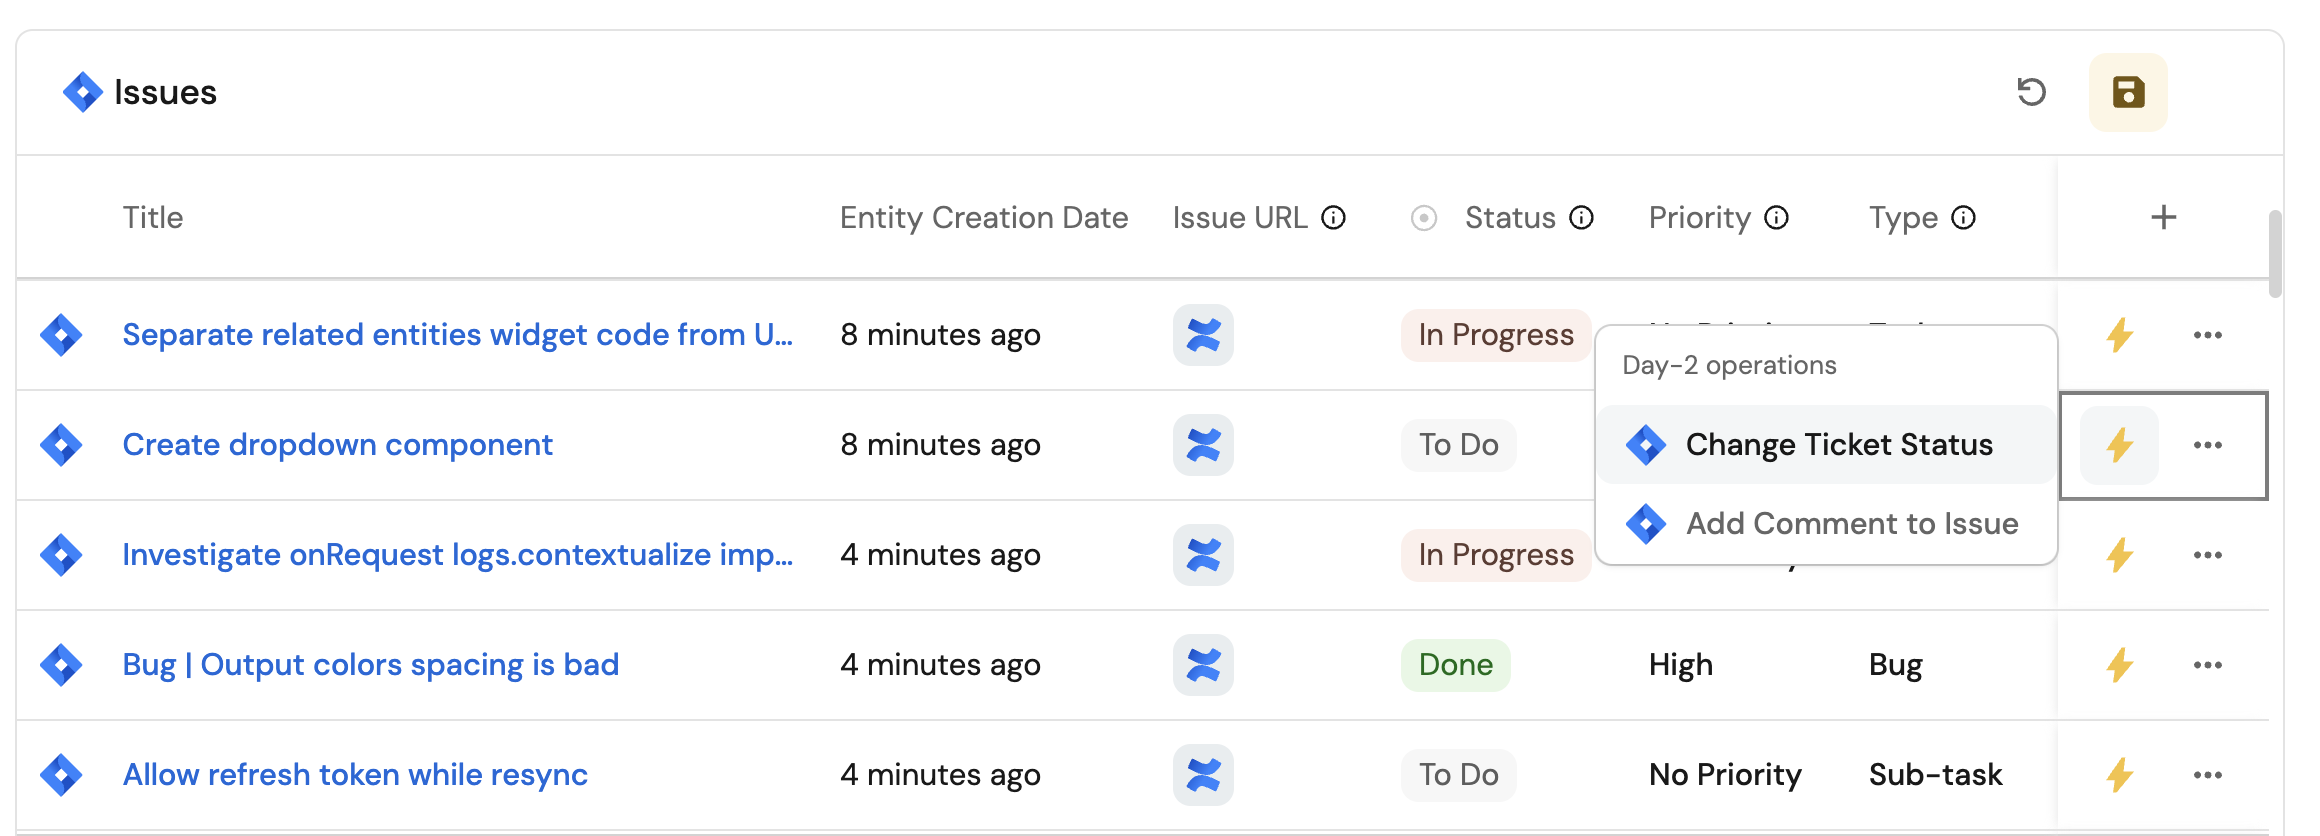
- Empower teams to manage tickets and perform day-2 operations via self-service actions.
- Track high-priority bugs and their resolution progress.
Prerequisites
This guide assumes the following:
- You have a Port account and have completed the onboarding process.
- Port's Jira integration is installed in your account.
Set up self-service actions
We will create self-service actions in Port to directly interact with the Jira REST API. These actions let users:
-
Create a new issue.
-
Change an issue's status.
-
Add comments to an issue.
Each action will be configured via JSON and triggered using synced webhooks secured with secrets. To implement these use-cases, follow the steps below:
Add Port secrets
To add a secret to your portal:
-
Click on the
...button in the top right corner of your Port application. -
Click on Credentials.
-
Click on the
Secretstab. -
Click on
+ Secretand add the following secret:-
JIRA_AUTH- Base64 encoded string of your Jira credentials. Generate this by running:echo -n "your-email@domain.com:your-api-token" | base64Replace
your-email@domain.comwith your Jira email andyour-api-tokenwith your Jira API token.One time generationThe base64 encoded string only needs to be generated once and will work for all webhook calls until you change your API token.
-
Create a new issue
-
Go to the Self-service page of your portal.
-
Click on the
+ New Actionbutton. -
Click on the
{...} Edit JSONbutton. -
Copy and paste the following JSON configuration into the editor.
Create Jira issue action (Click to expand)
Configure your Jira environmentReplace
<JIRA_ORGANIZATION_URL>in the webhook URL with your Jira organization URL (e.g.,example.atlassian.net).{
"identifier": "create_jira_issue",
"title": "Create Jira Issue",
"icon": "Jira",
"description": "Create a new Jira issue in the specified project",
"trigger": {
"type": "self-service",
"operation": "CREATE",
"userInputs": {
"properties": {
"title": {
"type": "string",
"title": "Title"
},
"description": {
"type": "string",
"title": "Description"
},
"project": {
"type": "string",
"title": "Project",
"blueprint": "jiraProject",
"format": "entity"
},
"issue_type": {
"type": "string",
"title": "Issue Type",
"default": "Task",
"enum": [
"Task",
"Story",
"Bug",
"Epic"
],
"enumColors": {
"Task": "blue",
"Story": "green",
"Bug": "red",
"Epic": "purple"
}
}
},
"required": [
"title",
"description",
"project",
"issue_type"
],
"order": [
"title",
"description",
"project",
"issue_type"
]
}
},
"invocationMethod": {
"type": "WEBHOOK",
"url": "https://<JIRA_ORGANIZATION_URL>/rest/api/3/issue",
"agent": false,
"synchronized": true,
"method": "POST",
"headers": {
"Authorization": "Basic {{.secrets.JIRA_AUTH}}",
"Content-Type": "application/json"
},
"body": {
"fields": {
"project": {
"key": "{{.inputs.project.identifier}}"
},
"summary": "{{.inputs.title}}",
"description": {
"version": 1,
"type": "doc",
"content": [
{
"type": "paragraph",
"content": [
{
"type": "text",
"text": "{{.inputs.description}}"
}
]
},
{
"type": "paragraph",
"content": [
{
"type": "text",
"text": "Reported by: {{.trigger.by.user.email}}"
}
]
}
]
},
"issuetype": {
"name": "{{.inputs.issue_type}}"
},
"labels": [
"port-ssa"
]
}
}
},
"requiredApproval": false
} -
Click
Save.
Now you should see the Create Jira Issue action in the self-service page. 🎉
Change issue status
-
Go to the Self-service page of your portal.
-
Click on the
+ New Actionbutton. -
Click on the
{...} Edit JSONbutton. -
Copy and paste the following JSON configuration into the editor.
Change Jira issue status action (Click to expand)
Configure your Jira environmentReplace
<JIRA_ORGANIZATION_URL>in the webhook URL with your Jira organization URL (e.g.,example.atlassian.net).{
"identifier": "change_jira_issue_status",
"title": "Change Issue Status",
"icon": "Jira",
"description": "Update a Jira ticket's status using a synced webhook",
"trigger": {
"type": "self-service",
"operation": "DAY-2",
"userInputs": {
"properties": {
"status": {
"icon": "DefaultProperty",
"title": "Status",
"type": "string",
"description": "Select the status to transition the issue to",
"enum": [
"To Do",
"In Progress",
"Done",
"Code Review",
"Product Review",
"Waiting For Prod"
],
"enumColors": {
"To Do": "lightGray",
"In Progress": "bronze",
"Done": "green",
"Code Review": "darkGray",
"Product Review": "purple",
"Waiting For Prod": "orange"
}
}
},
"required": [
"status"
],
"order": [
"status"
]
},
"blueprintIdentifier": "jiraIssue"
},
"invocationMethod": {
"type": "WEBHOOK",
"url": "https://<JIRA_ORGANIZATION_URL>/rest/api/3/issue/{{.entity.identifier}}/transitions",
"agent": false,
"synchronized": true,
"method": "POST",
"headers": {
"Authorization": "Basic {{.secrets.JIRA_AUTH}}",
"Content-Type": "application/json"
},
"body": {
"transition": {
"{{ if .inputs.status == 'To Do' then 'id' else 'none' end }}": 11,
"{{ if .inputs.status == 'In Progress' then 'id' else 'none' end }}": 21,
"{{ if .inputs.status == 'Done' then 'id' else 'none' end }}": 31,
"{{ if .inputs.status == 'Code Review' then 'id' else 'none' end }}": 41,
"{{ if .inputs.status == 'Product Review' then 'id' else 'none' end }}": 51,
"{{ if .inputs.status == 'Waiting For Prod' then 'id' else 'none' end }}": 61
}
}
},
"requiredApproval": false
} -
Click
Save.
Now you should see the Change Issue Status action in the self-service page. 🎉
Add comment to issue
-
Go to the Self-service page of your portal.
-
Click on the
+ New Actionbutton. -
Click on the
{...} Edit JSONbutton. -
Copy and paste the following JSON configuration into the editor.
Add Jira issue comment action (Click to expand)
Configure your Jira environmentReplace
<JIRA_ORGANIZATION_URL>in the webhook URL with your Jira organization URL (e.g.,example.atlassian.net).{
"identifier": "addCommentOnJiraIssue",
"title": "Add Comment to Issue",
"icon": "Jira",
"description": "Add a comment to a Jira issue using a synced webhook",
"trigger": {
"type": "self-service",
"operation": "DAY-2",
"userInputs": {
"properties": {
"comment": {
"icon": "DefaultProperty",
"title": "Comment",
"type": "string",
"description": "Enter the comment to add to the Jira issue"
}
},
"required": [
"comment"
],
"order": [
"comment"
]
},
"blueprintIdentifier": "jiraIssue"
},
"invocationMethod": {
"type": "WEBHOOK",
"url": "https://<JIRA_ORGANIZATION_URL>/rest/api/3/issue/{{.entity.identifier}}/comment",
"agent": false,
"synchronized": true,
"method": "POST",
"headers": {
"Authorization": "Basic {{.secrets.JIRA_AUTH}}",
"Content-Type": "application/json"
},
"body": {
"body": {
"type": "doc",
"version": 1,
"content": [
{
"type": "paragraph",
"content": [
{
"type": "text",
"text": "{{.inputs.comment}}"
}
]
}
]
}
}
},
"requiredApproval": false
} -
Click
Save.
Now you should see the Add Comment to Issue action in the self-service page. 🎉
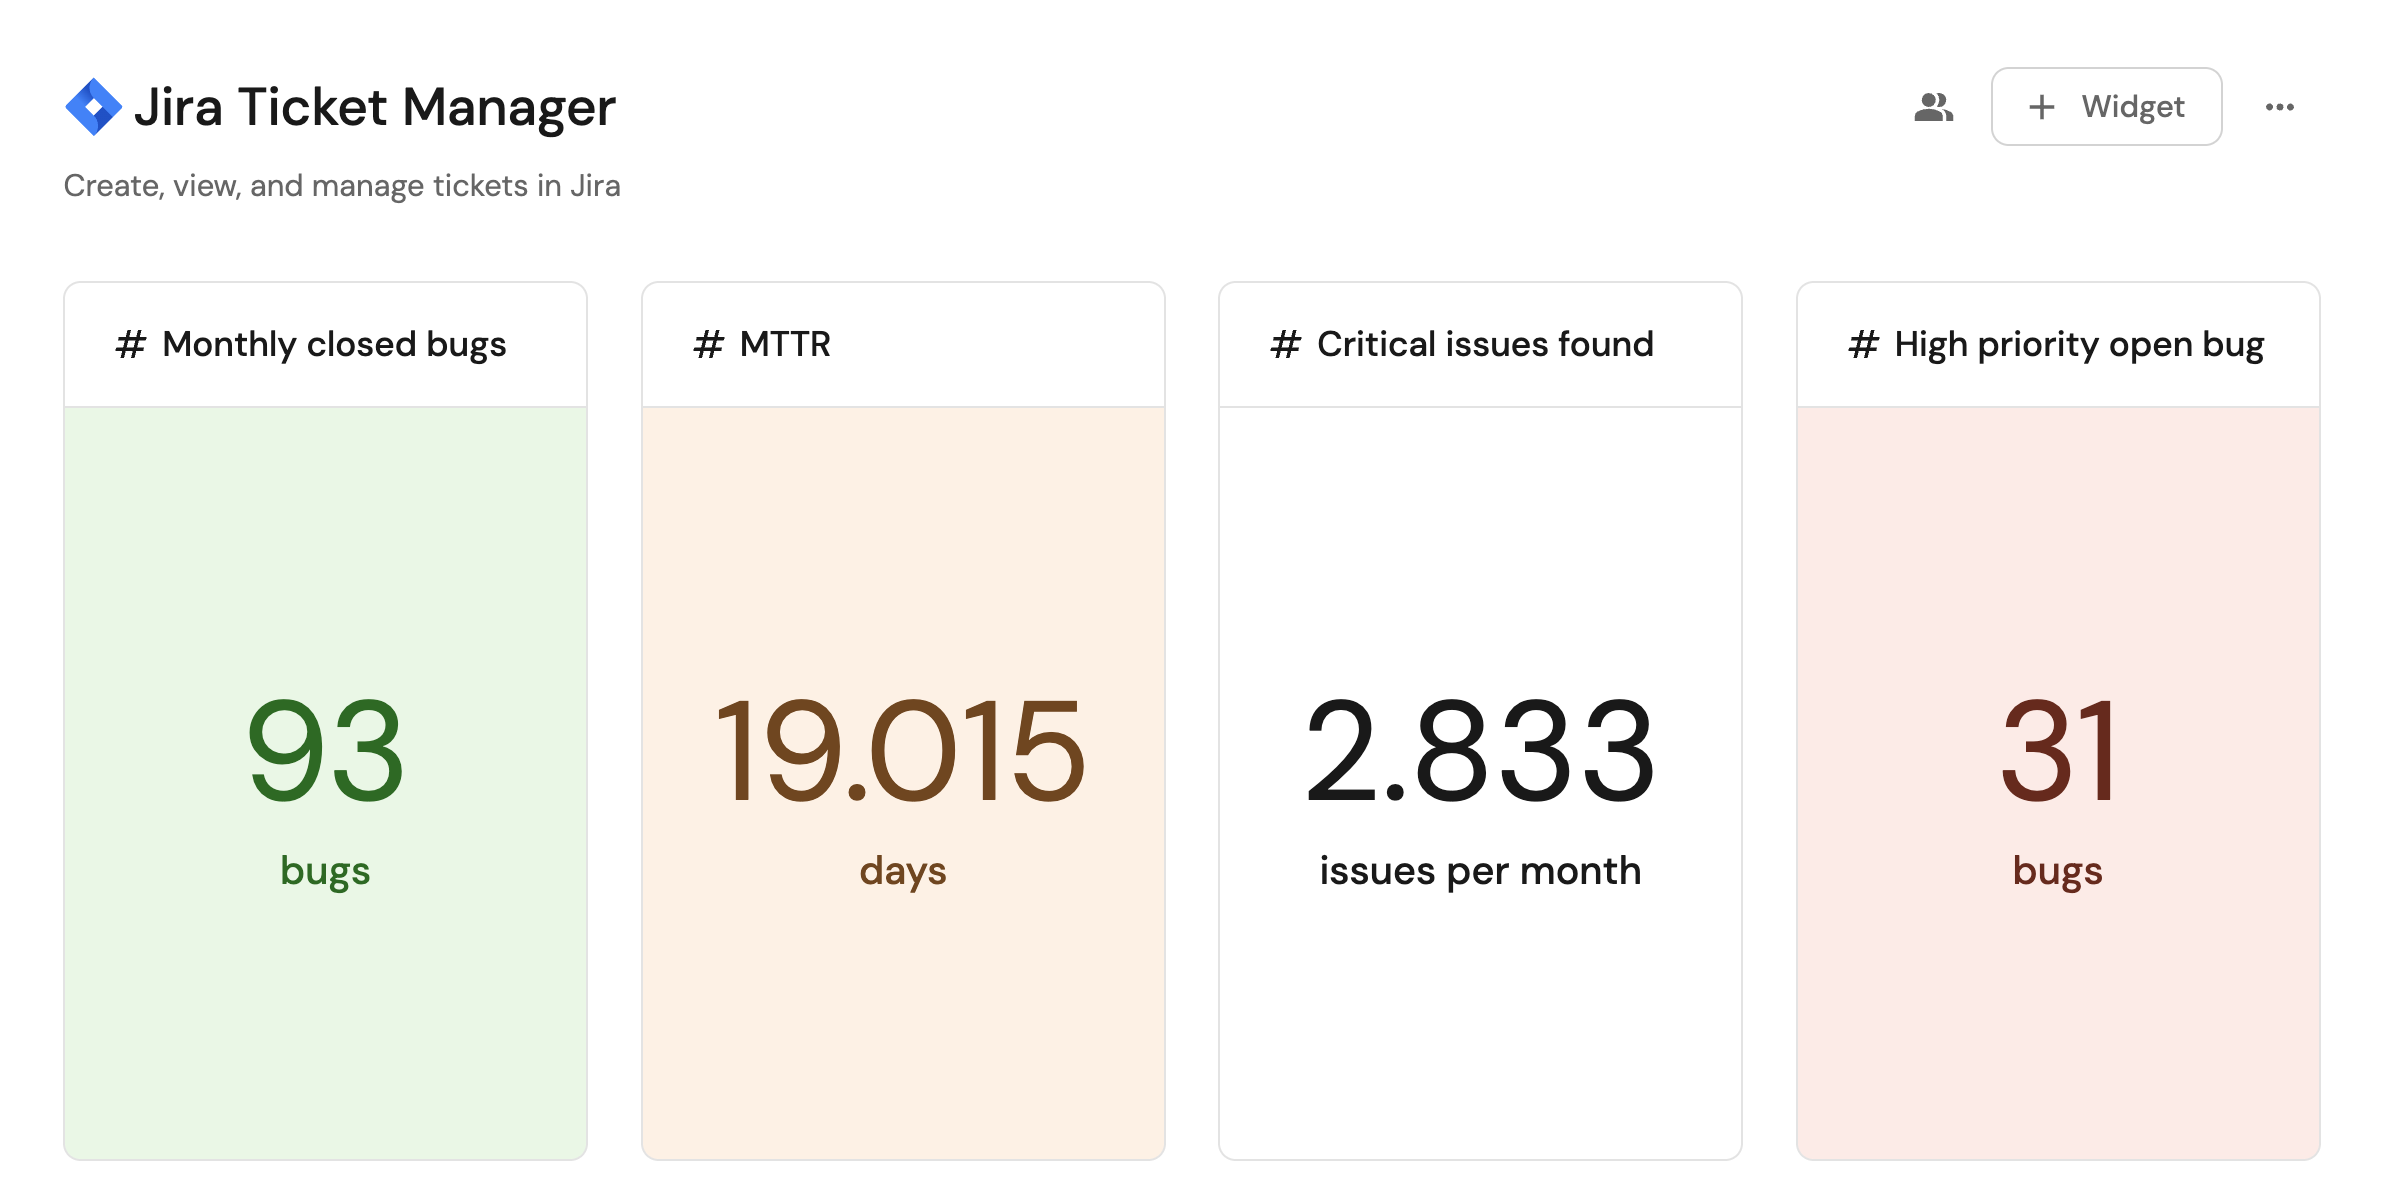
Visualize metrics
With issues ingested and actions configured, the next step is building a dashboard to monitor Jira data directly in Port. We can visualize key metrics using the following widgets: ticket status distribution, delivery timelines, and high-priority bug tracking. These customizable widgets provide insights into your Jira issues, helping you manage and prioritize effectively.
Create a dashboard
- Navigate to the Catalog page of your portal.
- Click on the
+ Newbutton in the left sidebar. - Select New dashboard.
- Name the dashboard Jira Issue Management.
- Input
Create, view and manage your Jira issuesunder Description. - Select the
Jiraicon. - Click
Create.
We now have a blank dashboard where we can start adding widgets to visualize insights from our Jira issues.
Add widgets
In the new dashboard, create the following widgets:
Average monthly closed bugs (click to expand)
- Click
+ Widgetand select Number Chart. - Title:
Monthly closed bugs(add theJiraicon). - Select
Count entitiesChart type and choose Jira Issue as the Blueprint. - Select
averagefor the Function and choosemonthunder Average of. - Select
resolutionDatefor the Measure time by. - Add this JSON to the Additional filters editor to filter closed bugs in the current month:
[
    {
        "combinator":"and",
        "rules":[
            {
                "property":"issueType",
                "operator":"=",
                "value": "Bug"
            },
            {
                "property":"status",
                "operator":"=",
                "value": "Done"
            }
        ]
    }
] - Select
customas the Unit and inputbugsas the Custom unit. - Click
Save.
Mean time to resolve (MTTR) in days (click to expand)
- Click
+ Widgetand select Number Chart. - Title:
Mean time to resolve (MTTR)(add theJiraicon). - Select
Aggregate by propertyChart type and choose Jira Issue as the Blueprint. - Select
Handling Duration (Days)for the Property and choosemedianfor the Function. - Select
customas the Unit and inputdaysas the Custom unit. - Click
Save.
Total critical issues found per month (click to expand)
- Click
+ Widgetand select Number Chart. - Title:
Critical issues found per month(add theJiraicon). - Select
Count entitiesChart type and choose Jira Issue as the Blueprint. - Select
averagefor the Function and choosemonthunder Average of. - Select
createdfor the Measure time by. - Add this JSON to the Additional filters editor to filter critical issues created this month:
[
    {
        "combinator":"and",
        "rules":[
            {
                "property":"priority",
                "operator":"in",
                "value": ["High", "Now (Urgent)"]
            },
            {
                "property":"issueType",
                "operator":"=",
                "value": "Bug"
            }
        ]
    }
] - Select
customas the Unit and inputissuesas the Custom unit. - Click
Save.
High open priority bugs (click to expand)
- Click
+ Widgetand select Number Chart. - Title:
High open priority bugs(add theJiraicon). - Select
Count entitiesChart type and choose Jira Issue as the Blueprint. - Select
countfor the Function. - Add this JSON to the Additional filters editor to filter high priority open bugs:
[
    {
        "combinator":"and",
        "rules":[
            {
                "property":"issueType",
                "operator":"=",
                "value": "Bug"
            },
            {
                "property":"priority",
                "operator":"in",
                "value": ["Now (Urgent)", "High"]
            },
            {
                "property":"status",
                "operator":"!=",
                "value": "Done"
            }
        ]
    }
] - Select
customas the Unit and inputbugsas the Custom unit. - Click
Save.
Create Jira issue action (click to expand)
- Click
+ Widgetand select Action card. - Choose the Create Jira Issue action we created in this guide.
- Click Save.
Critical ongoing bugs in the past week (click to expand)
- Click
+ Widgetand select Table. - Title the widget Critical ongoing bugs.
- Choose the Jira Issue blueprint.
- Add this JSON to the Additional filters editor to show only high/critical issues in progress or code review:
{
  "combinator": "and",
  "rules": [
    {
      "property": "status",
      "operator": "in",
      "value": [
        "In Progress",
        "Code Review"
      ]
    },
    {
      "property": "issueType",
      "operator": "=",
      "value": "Bug"
    },
    {
      "property": "created",
      "operator": "between",
      "value": {
        "preset": "lastWeek"
      }
    },
    {
      "operator": "=",
      "value": "jiraIssue",
      "property": "$blueprint"
    }
  ]
} - Click Save to add the widget to the dashboard.
- Click on the
...button in the top right corner of the table and select Customize table. - In the top right corner of the table, click on
Manage Propertiesand add the following properties:- Status: The current status of the issue.
- Assignee: The assignee of the issue.
- Priority: The issue priority.
- Created: The date the issue was created.
- Project: The related Jira project.
- Click on the save icon in the top right corner of the widget to save the customized table.
Issue types distribution (click to expand)
- Click
+ Widgetand select Pie chart. - Title:
Issue types distribution(add theJiraicon). - Choose the Jira Issue blueprint.
- Under
Breakdown by property, select the Type property. - Add this JSON to the Additional filters editor to show only issues created in the past 3 months:
[
    {
        "combinator":"and",
        "rules":[
            {
                "property":"created",
                "operator":"between",
                "value": {
                    "preset":"last3Months"
                }
            }
        ]
    }
] - Click Save.